

Angular Setup and Your First Project: Preparing the Environment from Scratch
We install Node.js and the Angular CLI step by step, create our first project, then walk through the folder structure to learn what every file does before writing a single line of app code.
Before Writing Code: What Do We Need?
A carpenter's first job isn't cutting the wood; first they set up the bench, sharpen the tools, prepare the work area. We'll do the same. Before we start writing Angular, we need three things: Node.js, npm, and the Angular CLI. In this article we'll install all three, create our first project, and explore the resulting folder structure inch by inch.
Don't worry, you don't need to memorize any of it. The goal is that when we write our first component in the next article, you won't get stuck wondering "what was this file again?"
What Is Node.js and Why Do We Need It?
Angular is a framework that runs in the browser, so why do we need Node.js, a server technology? The answer is this: we use Node.js not to run the application, but to develop it.
Think of it this way: the browser doesn't understand the TypeScript code you write directly; it has to be converted to JavaScript first. The code has to be bundled, minified, and served on a development server. Node.js does all of this "back kitchen" work. Node.js is the kitchen of the development process; the meal (your app) is ultimately served in the browser, but the cooking happens in this kitchen.
Along with Node.js comes npm (Node Package Manager) automatically. npm is the tool that downloads and manages the ready-made packages your project needs; everything, including Angular itself, arrives through npm.
Installing Node.js and the Version Question
You can download and install Node.js from nodejs.org. You'll be offered two options: LTS and Current. Almost always choose the LTS (Long Term Support) version. LTS is the stable version, supported for a long time; Current is the newest but less settled one. In a development environment, stability is more valuable than having the newest thing.
After installation, open your terminal and check with these two commands:
node -v
npm -v
If both return a version number (something like v20.11.0), the installation succeeded. An important note here: the Angular and Node versions must be compatible. Each Angular version requires a specific Node range, and the CLI will warn you if your Node is incompatible. That's why using a current LTS version prevents most headaches up front.
Angular CLI: The Series' Closest Friend
The Angular CLI (Command Line Interface) is the Swiss Army knife of Angular development. Creating a project, generating a component, running the app, producing a build; all of it is done with a single command-line tool. Angular can be written without it, but no one does; writing Angular without the CLI is like washing laundry by hand. Possible, but why?
We install the CLI globally with npm. "Global" means this tool is installed not into a single project but everywhere on your machine; so you can run the ng command in any folder you like.
npm install -g @angular/cliThe -g flag in this command means "global," and @angular/cli is the name of the package we're installing. When the installation finishes, check it by running:
ng versionIf Angular's famous ASCII logo and version details appear, congratulations; you're now ready to develop Angular.
A small tip: our series starts from the Angular 12 foundation. If you want to install a specific version, you can append the version to the package name: npm install -g @angular/cli@12. But don't get stuck on this; the latest CLI works perfectly well for learning the concepts, because the basic commands barely change between versions.
Creating Our First Project
Now for where the magic begins. In the terminal, go into the folder where you want to keep your projects and run this command:
ng new first-appHere ng new is the "create a new project" command, and first-app is our project name. The CLI will ask you a few questions. You'll usually encounter these two: whether to add routing, and which style format to use (CSS, SCSS, etc.). For now you can say "no" to routing and "CSS" for style; we'll cover routing separately in later articles.
After you press Enter, the CLI does a lot of work in the background: it sets up the folder structure, downloads all the required npm packages, and initializes a git repository. This can take a few minutes depending on your internet speed. When it's done, let's enter the project and bring the app to life:
cd first-app
ng serve
After a short compile, the terminal gives you an address, usually http://localhost:4200. When you open this address in your browser, you'll see Angular's welcome page. Your first Angular app is running; and without writing a single line of code.
So What Are All These Folders?
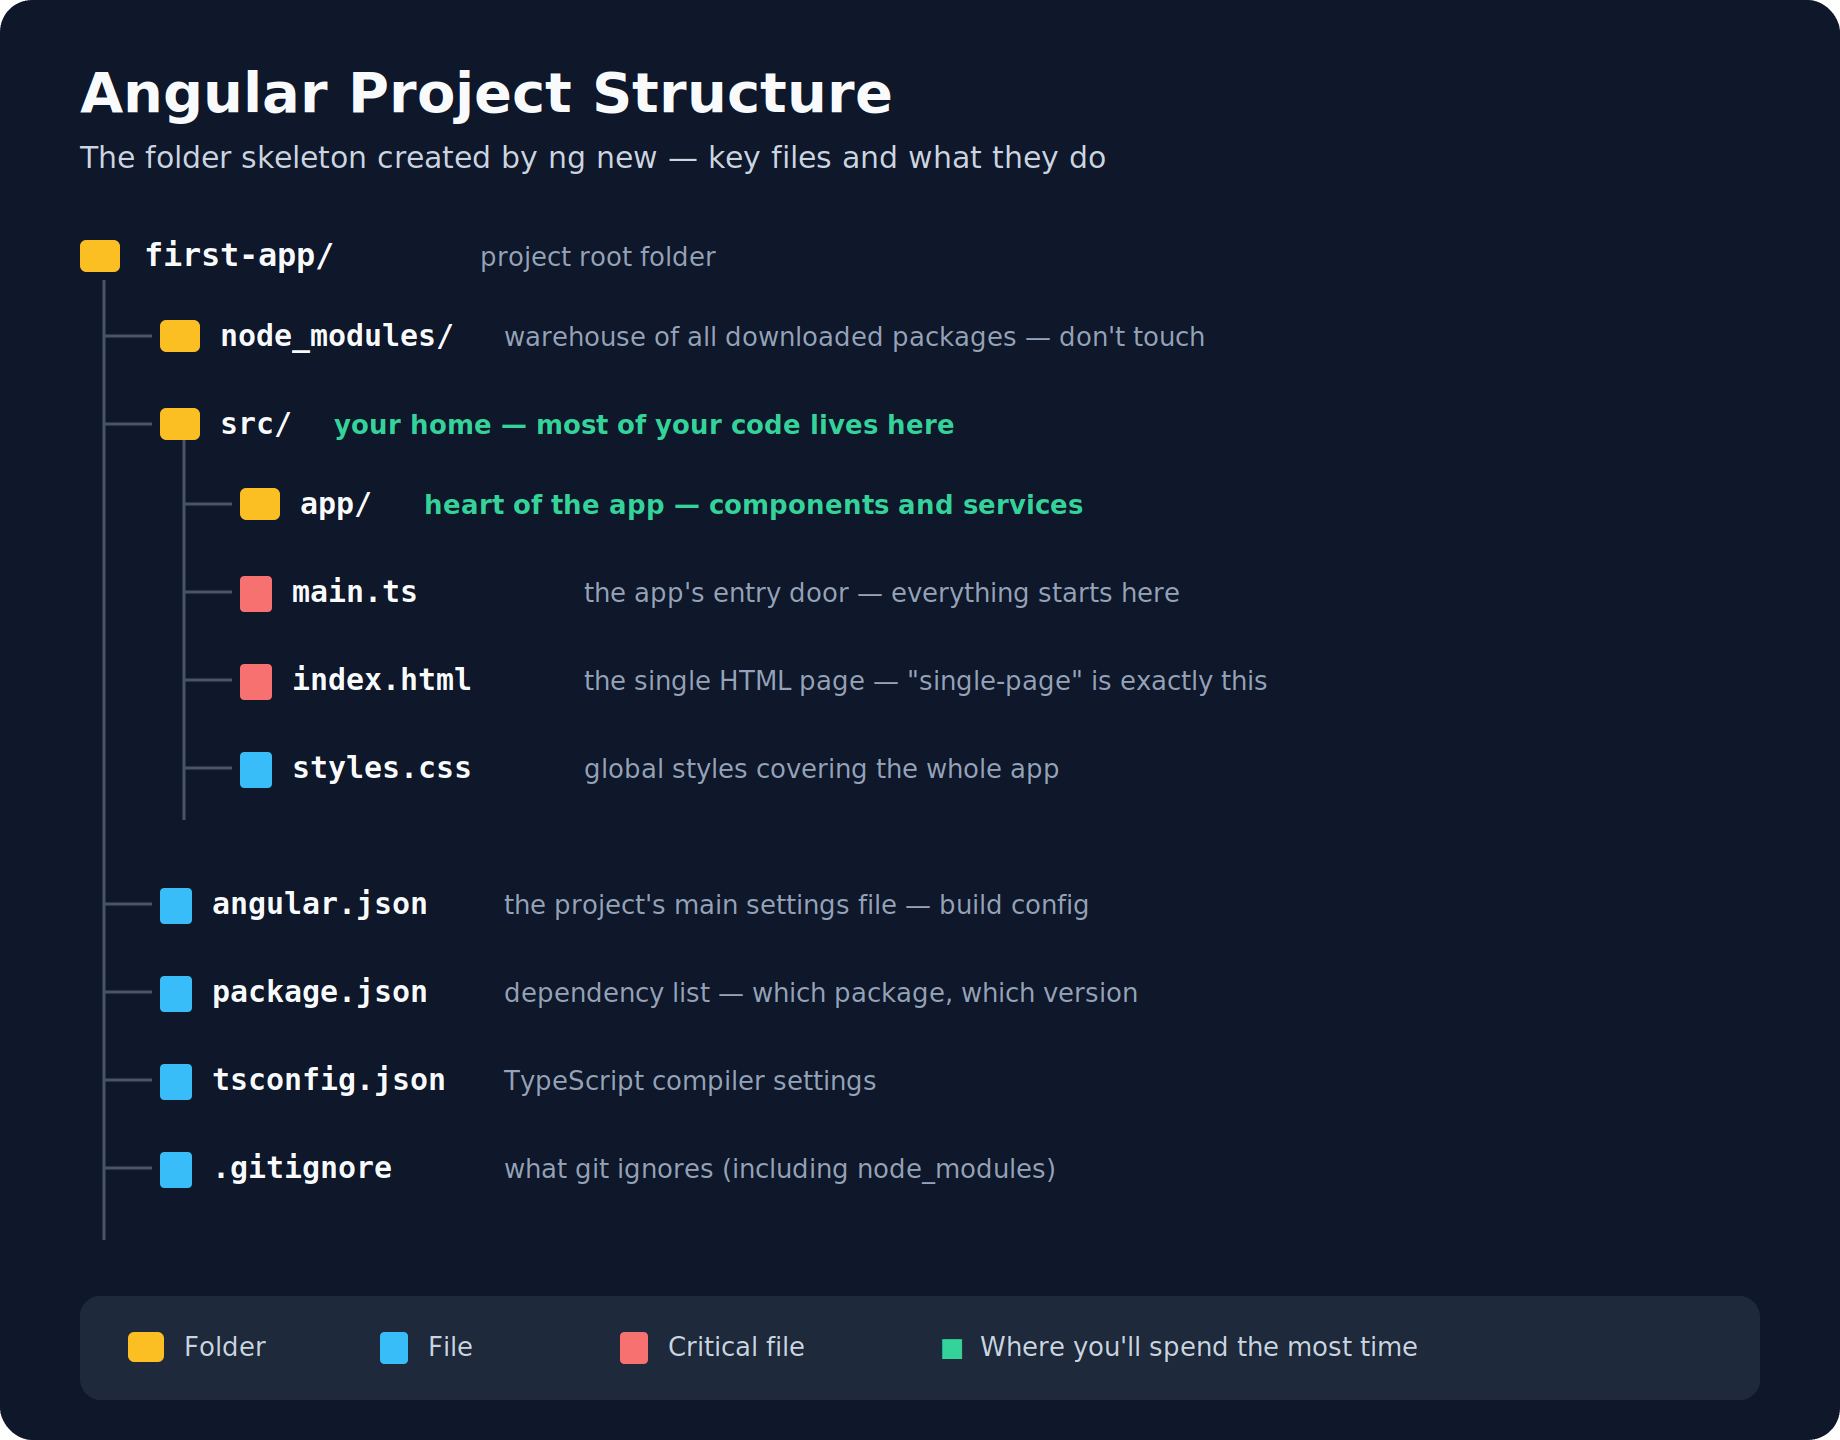
When you open the project folder in a code editor (VS Code, for instance), your first reaction will probably be "what is all this?" No panic. This structure, intimidating at first, is actually extremely orderly, and apart from a few files you won't touch most of it for months. Let's tour the important ones.
The src/ folder is your home. Nearly everything you write lives here; everything else exists to support this folder. Inside it, src/app/ is the heart of the application; your components, services, in short the bulk of your own code, goes here.
src/main.ts is the application's entry door. The browser starts running the Angular app from here; it's like the first page of a book. src/index.html is the single HTML page the entire application sits on. This is exactly what "single-page application" means; that one page is this file. When you look inside it, it appears almost empty because Angular fills its content at runtime.
angular.json is the project's main settings file; configurations like build settings and which style files to include live here. package.json is the project's dependency list; it states which packages and which versions you depend on. When you move a project to another machine, the npm install command downloads the missing packages by looking precisely at this file.
There's also node_modules/; the enormous folder where all downloaded packages sit and which you'll never touch by hand. It's so large that it's usually not even added to git; after all, it can be re-downloaded anytime thanks to package.json. Think of it as a warehouse; the materials sit there, and you only ever look at your recipe (package.json).
What's Happening Behind ng serve?
One more detail, because it's nice to see it from day one. While ng serve is running and the app is open, if you make a change to any file inside src/ and save it, the browser refreshes by itself and shows your change instantly. This is called "hot reload."
This is a feature that supercharges development speed. Instead of manually hitting "save and preview" after every sentence while writing, it's like the result appearing instantly on the side screen as you type. In the background, the CLI continuously watches your files and recompiles the necessary part on every change. You just focus on writing code.
A Small Experiment
If you've completed the setup, let's do a tiny but satisfying experiment; you'll change something with your own hand for the first time. Go into the src/app/ folder and open the app.component.html file. Inside it is the welcome template the CLI created. Delete all of it and write a single line in its place:
<h1>Hello Mert, the Angular journey has begun!</h1>Save the file and go back to your browser. If ng serve is still running, the page will refresh by itself and the heading you wrote will appear on screen. You didn't even need to refresh the browser manually; you've just seen hot reload with your own eyes for the first time.
Now one step further: in the same file, add a second line under the heading and write your own name. Save, and watch it appear on screen. This small moment is actually the core of Angular development; you change the source, and the result comes to you instantly. In the next article, you'll learn that this HTML is actually managed by a component, and we'll build that magical structure from scratch ourselves.